
A practical chastity cage cleaning routine begins before the device reaches the sink. You need a removable schedule, the product’s own care guidance, and enough time to inspect openings, ring junctions, and detachable parts. A visible vent is useful for access, but it does not prove that the inside is clean or dry. This guide is for adults using a device by informed consent; it does not replace product instructions or medical advice.
1. Set a Removable Cleaning Routine
Agree on when the device comes off, who can release it, and what symptoms trigger immediate removal. Keep the key or release method available. Waiting until irritation appears makes cleaning harder and can obscure a developing fit problem. The earlier chastity cage sizing guide explains how ring pressure and alignment affect comfort; those same contact areas deserve attention during cleaning.
Check the body before cleaning the device
After removal, look at skin where the ring, cage edge, or attachment rested. Do not put a cleaned device back on over painful, broken, swollen, or unusually discolored skin. Stop use and seek appropriate medical advice for concerning symptoms.
2. Read the Instructions for Every Component
Identify the cage body, ring, lock, keys, chain, fabric, and any moving attachment. Different components may have different care limits even when sold as one set. The catalog’s 3D-printed gas-mask cage with a harness illustrates why a cage body and elastic straps should not be treated as one material. Confirm what can be detached and what the seller approves for washing; never force a part apart to make cleaning easier.
Do not infer a cleaning method from a material label
Terms such as stainless steel, resin, or 3D-printed describe construction, not a complete care protocol. Coatings, adhesives, surface finish, hardware, and straps may have different limits. If the product listing lacks clear instructions, ask the seller through the contact page before using heat, solvents, bleach, abrasive tools, or prolonged soaking.
3. Clean the Cage Body Without Missing Contact Points
When the maker permits water and a mild cleaner, clean the removed device thoroughly and rinse away residue. Pay special attention to the underside of the ring, seams, ends of tubes or openings, and any place that held moisture against skin. Use a soft tool only if the maker approves it; a hard brush may damage a finish or leave scratches that are harder to inspect later.
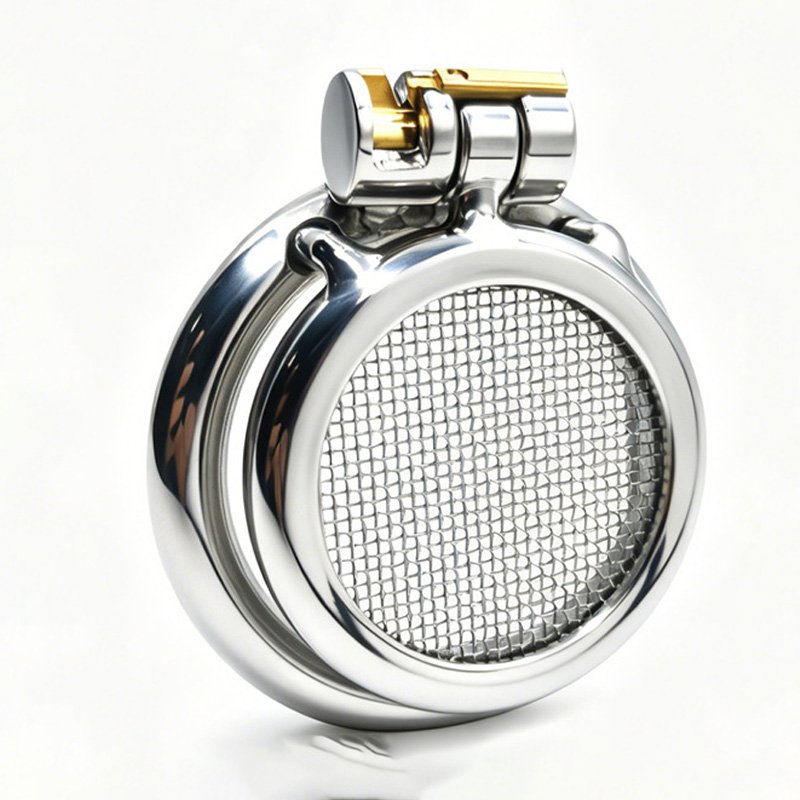
A metal mesh cage with an arc ring has a mesh basket and ring variants in its listing. Mesh offers more visible openings, but each crossing and the ring junction still need a careful check. Never equate airflow claims in product copy with a guarantee of hygiene.
4. Compare Openings, Finishes, and Attachments
The catalog’s ventilated resin cage lists multiple ventilation holes. A hole still needs inspection at its edge and inner surface. The stainless steel shield with chain adds a separate chain and shield cutouts, so the cleaning plan must account for both the plate and the attachment. These are examples of different access points, not claims that one device is universally easier to maintain.
| Construction detail | Inspection point | Care decision |
|---|---|---|
| Mesh or cutout | Crossings, edges, inner surface | Confirm every opening can be reached and rinsed |
| Ventilated resin | Hole edges, seams, finish | Follow the listing’s approved cleaner and avoid abrasives |
| 3D print with straps | Surface texture, attachment loops, elastic | Check cage and strap guidance separately |
| Lock or chain | Crevices and moving hardware | Check whether water exposure or disassembly is allowed |
5. Dry Before Reassembly
Rinsing is not the final step. Separate approved removable parts, shake out water gently, and allow enough time for air to reach holes, ring junctions, and hardware. Inspect under good light; if you can still see or feel moisture in an accessible area, the device is not ready for storage. Avoid applying high heat unless the maker explicitly allows it.
6. Inspect Wear and Retire Damaged Parts
Run a visual check across contact edges, locking points, fasteners, and straps. Look for cracks, rough spots, corrosion, loose fittings, or a finish that has changed. Do not attempt to keep using a damaged part because it still locks. Ask the seller for a compatible replacement or retire the device; improvised adhesives or modifications can introduce new surfaces and unknown strength.
7. Store Clean, Dry Parts Together
Keep the cage, verified compatible lock, and keys together in a clean dry place where the intended adult users can access them. Separate pieces if they could scratch one another, and keep care notes with the product record. Do not store a damp item in a sealed container. A predictable storage routine also makes it easier to notice a missing key or worn component before the next use.
8. Choose a Design You Can Maintain
Before buying, ask whether you can see, reach, rinse, and dry every area that may contact skin or collect moisture. Compare the maker’s cleaning instructions with your available time and equipment. For a first purchase, the site’s beginner product selection provides a starting catalog view, but the actual product instructions should decide whether its cleaning routine is realistic for you. If access is unclear, clarify it before ordering.
FAQ: Cleaning and Drying a Chastity Cage
Can I clean a chastity cage while wearing it?
A quick rinse does not replace removing the device for full cleaning, drying, and a skin check. Agree on a removable routine in advance and stop use if discomfort or skin changes appear.
Should a lock, chain, or fabric harness be soaked with the cage?
Do not assume all components share the same care instructions. Check the seller’s guidance for each material and mechanism, clean detachable pieces separately when allowed, and dry them fully before storage.
How do I know a cleaned cage is ready to store?
Inspect openings, seams, ring junctions, and moving parts under good light. Store only when every accessible surface is clean and completely dry; ask the seller if a hidden cavity cannot be checked or dried.